Learn how to make salt dough and sculpt your way to success! Discover this amazing salt dough recipe that’s perfect for schools and maps projects. Create stunning, unique artwork that’ll impress everyone.

Are you ready to take your salt dough map assignment to the next level?
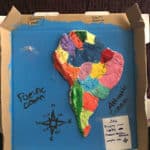
Picture this: you hand in your project, confident and proud, knowing that you’ve aced it.
Well, I’m here to share with you the secret weapons that top students use to achieve exceptional results in their salt dough map assignments.
Whether you’re a seasoned pro or just starting out, get ready to uncover the tips and tricks that will make your salt dough map stand out from the rest.
Choose the Right Materials
The first step towards aceing your salt dough map assignment is to choose the right materials.
By selecting high-quality ingredients and tools, you can set yourself up for success right from the start.
When it comes to the dough itself, use this simple recipe that has been proven to work well for this type of project.
It strikes the perfect balance between pliability and durability, ensuring that your map holds its shape while still being easy to work with.
In addition to the dough recipe, consider the tools you’ll need to bring your map to life.
A rolling pin will help you achieve an even thickness throughout your dough, while cookie cutters or a sharp knife can be used to create precise shapes.
Don’t forget about smaller tools like toothpicks or modeling tools, which can be handy for adding fine details or carving out intricate features.
When it comes to coloring your dough, consider using food coloring or natural ingredients such as cocoa powder or spices to achieve the desired hues.
Experiment with different shades and mixtures to create depth and realism in your map.
Lastly, don’t overlook the importance of a sturdy base for your project.
Choose a material that can support the weight of the dough and withstand any special techniques you plan to use, such as painting or gluing on additional elements.
A piece of sturdy cardboard, a wooden board, or even a clean pizza box can provide the stability you need to create a map that stands the test of time.
By taking the time to choose the right materials, you’re setting yourself up for success in creating a salt dough map that not only impresses your teacher but also allows you to showcase your creativity and craftsmanship.
Plan and Research Thoroughly
When it comes to creating a salt dough map, your success lies in the planning and research you put into your project.
Before diving into the actual creation process, take the time to thoroughly plan and gather the necessary information.
This will not only help you create a more accurate and detailed map, but it will also make the entire process much smoother and more enjoyable.
First and foremost, familiarize yourself with the geography and features of the area you’ll be representing on your salt dough map.
Understand the topography, major landmarks, rivers, mountains, and any other significant elements that make up the landscape.
This knowledge will not only make your map more realistic but will also demonstrate your understanding of the subject matter.
Additionally, consider the scale of your map and the level of detail you want to achieve.
Are you focusing on an entire country, a specific region, or even a city?
Determine the appropriate scale based on the size of your project and the level of intricacy you desire.
Remember, the more detailed your map, the more time and effort it will require.
Master the Salt Dough Techniques
Once you have a clear vision of what you want to create, it’s time to gather the necessary materials.
As mentioned earlier, a sturdy base is crucial for the longevity of your salt dough map.
Look for a material that can support the weight of the dough and withstand any additional techniques you plan to incorporate, such as painting or gluing on extra elements.
A piece of sturdy cardboard or a wooden board can provide the stability you need.
Now that you have your base, it’s time to dive into the salt dough techniques that will elevate your map.
One of the key skills to master is the art of rolling and shaping the dough.
Rolling and Shaping the Dough
Start by kneading the dough until it becomes smooth and pliable.
This will ensure that it holds its shape well and doesn’t crack or crumble during the drying process.
Experiment with different textures and thicknesses to add depth and dimension to your map.
Another technique to explore is carving and detailing.
Carving and Detailing
Once the dough is rolled out and shaped, you can use various tools like toothpicks or knife edges to create intricate lines, patterns, or even topographical features.
Make sure to plan ahead and visualize how these details will enhance the overall design of your map.
From rivers and mountains to city boundaries and roads, the possibilities are endless.
Don’t forget about texture!
Adding texture to certain areas of your salt dough map can make it more visually interesting and realistic.
You can achieve this by pressing different objects onto the dough, such as burlap, lace, or even leaves.
This will create a unique and tactile experience when viewing your map.
Lastly, consider incorporating color and visual effects to bring your map to life.
Incorporating Color and Visual Effects
Painting your salt dough map can add vibrancy and differentiation to various regions, making it easier to distinguish between different geographical elements.
You can also experiment with different painting techniques, such as dry brushing or sponging, to achieve a weathered or textured appearance.
Additionally, consider adding other elements, like small figurines or trees, to further enhance the visual storytelling aspect of your map.
By mastering these salt dough techniques, you’ll be able to create a salt dough map that not only accurately represents the geography but also showcases your artistic flair.
With attention to detail and a bit of experimentation, your map will undoubtedly stand out among the rest.
Take Your Time and Pay Attention to Details
By taking your time and paying attention to details, you can elevate your salt dough map assignment to a whole new level of excellence.
While the techniques we’ve covered so far will help you create a map that accurately reflects the geography you’re studying, it’s the small details that will set your creation apart from the rest.
When working with salt dough, it’s important to remember that patience is key.
Take the time to knead the dough thoroughly and ensure it’s smooth and free of any lumps or bumps.
This will provide a solid foundation for your map and make it easier to create precise shapes and contours.
As you begin to shape your landforms and landmarks, pay close attention to the details.
Research and reference actual maps or images of the locations you’re representing to ensure accuracy.
Consider the individual characteristics of each landform – the curves of a mountain range, the meandering path of a river, or the jagged edges of a coastline.
By capturing these details, you can bring your map to life and make it a visually striking representation of real-world geography.
Experiment with different textures and techniques to add depth and dimension to your map.
Use a toothpick or small tool to create realistic textures on mountains or forests, and gently press down on the dough to create the illusion of valleys or canyons.
Don’t be afraid to get creative and add unique touches that make your map stand out – perhaps a tiny flag to mark a historical site or a small boat navigating a river.
Remember, attention to detail doesn’t end with the shaping and molding stages.
Once your map is dry and hardened, take the time to paint it carefully.
Select colors that accurately represent the natural elements you’re portraying, whether it’s the lush green of a forest or the rich brown of a desert.
Use fine brushes to add intricate details such as roads, borders, or landmarks.
Taking your time during this final step will ensure a polished and professional-looking map.
Presentation is Key
Presentation is key when it comes to showcasing your salt dough map assignment.
After putting in all the effort to create a detailed and accurate representation, it’s important to present it in a way that does justice to your hard work.
The following tips will help you elevate the presentation of your map and make it even more impressive:
- Mount it on a sturdy backing: Consider using a thick foam board or a wooden panel as a stable base for your salt dough map. This will not only provide support but also add a professional touch to your presentation. Ensure that the size of the backing complements the dimensions of your map.
- Frame it: If you want to take your presentation to the next level, consider framing your salt dough map. A simple, elegant frame can add a touch of sophistication and make your map stand out even more. Opt for a frame that complements the colors and style of your map.
- Include a legend: A legend is a great addition to your salt dough map, especially if it includes various elements or symbols. Create a separate section on your map that explains the meaning of different colors, symbols, or markings used. This will not only enhance the visual appeal but also make it easier for others to understand your map.
- Display it with proper lighting: Lighting can make a significant difference in how your salt dough map is perceived. Consider placing it in a well-lit area or using spotlights to highlight certain features. Adequate lighting will not only ensure visibility but also bring out the vibrant colors and intricate details.
Mastering your salt dough map assignment is within reach when armed with these proven hacks.
By carefully selecting the right materials, conducting thorough research and planning, mastering the vital techniques, infusing creative details, and paying unwavering attention to every aspect, you can confidently present your project with professionalism and distinction.
Your dedication will pay off as you impress your teacher and pave the way to success.
Remember, success is not accidental—it is earned through meticulous effort and a commitment to excellence.
So, go ahead and ace your salt dough map assignment, knowing that with the right tools and strategies, your potential is limitless.
If you use our recipe and get an A+ on your assignment, we’d like to see it! Tag us in a photo of your creation @gracelikerainblog on any social media channel or leave us a comment.

How to make salt dough
Equipment
- hands
Materials
- 4 cups all-purpose flour
- 2 cups salt
- 2 Tbsp cream of tartar
- 1 1/2 – 2 cups water
Instructions
- Mix together the dry ingredients then add the water a little bit at a time until the dough is the consistency of Play-Doh. Don't be afraid to use your hands.
- Knead for a few minutes until smooth.
Notes
How to Make an Edible Animal Cell Cake(Opens in a new browser tab)