How to Make an Animal Cell Cake
Yield: 1 cake
Equipment
- 8-inch round cake pan
- 8-inch diameter oven-safe bowl
- toothpicks
- 2-inch labels
Materials
- 1 cake mix + ingredients listed on the box
- 1 recipe Buttercream frosting
- yellow gel food coloring
- orange gel food coloring
- blue or green gel food coloring
- Airhead Extreme candy belts
- Tootsie pops
- white candy melts
- sour gummy worms or Twizzlers
- Red Mike & Ike candy
- Red gummy bears
- white jelly beans
Instructions
- Preheat the oven to 350 degrees F.
- Mix up a box of your favorite cake mix according to the package directions.
- Grease an 8-inch cake pan with non-stick cooking spray and pour in about 1/3 of the cake batter.
- Grease an 8-inch diameter bowl that is oven-safe and pour in the remaining 2/3 of the cake batter.
- Bake the cakes according to the instructions for an 8-inch pan, usually about 28-32 minutes. Check both cakes for doneness by inserting a toothpick into the centers. The cakes are done when the toothpick comes out with a few moist crumbs. The cake baked in the bowl will probably need to be baked 6-10 minutes longer than the one in the cake pan. Allow the cakes to cool for 10 minutes then remove the cakes from the pan and bowl to a sheet of waxed paper. Cool cakes completely.
- Level the flat cake using a serrated knife. Level the flat side of the domed cake, if needed. Cut the domed cake in half across the middle.
- Mix up the Buttercream frosting.
- Divide the frosting. Put half of the frosting in a bowl and dye it orange using a few drops of orange food coloring. Remove about a half cup of the remaining white frosting and dye it blue or green. Tint the remaining frosting yellow.
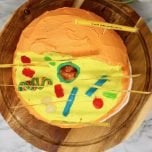
- Place the flat cake on a serving platter. Place the domed cake toward the top of the flat cake. The domed cake will be smaller than the flat cake and this is okay. Spread the yellow frosting on the top of the flat cake that is visible and the cut side of the domed cake that is adjacent to the flat cake. The yellow area represents the inside of your cell, the cytoplasm.
- Spread the orange frosting on the top of the domed cake and all along the outside of the cake. The orange area represents the cell membrane.
- Use a pair of scissors or a sharp knife to cut off the end of the Tootsie Roll Pop stick, leaving about 1 inch. Insert the lollipop into the center of the cell where the flat cake and the domed cake meet. This is the nucleus.
- Spoon the blue or green frosting into a plastic zip-top baggie then snip off the tip and use it to pipe a ring of frosting around the lollipop. This is the nuclear membrane.
- Take an Airhead Extreme candy belt and gently fold it into a zig-zag pattern. Place it in the yellow portion of the cake for the Golgi body.
- Place white jelly beans (substitution: white candy melts) on the cake for ribosomes.
- Cut Twizzlers into 1 1/2-inch pieces and place them on the cake for the endoplasmic reticulum. If you need to identify rough ER and smooth ER, you can use sour gummy worms for the rough ER and red Mike & Ike candy for the smooth ER.
- Place red gummy bears on the cake for mitochondria.
- Place gummy Skittles on the cake for vacuole.
- Create labels either by hand-writing the cell parts on white printer labels or by printing the cell parts on a piece of paper. Affix the labels onto toothpicks.
Notes
Most glass bowls or metal bowls are oven-safe but be sure to check yours to be sure.
For the cell cake in the photo, I designed the labels in Microsoft Excel and added borders. I printed two copies of the labels, cut them out, and glued them to a toothpick using a hot glue gun to make a double-sided label.
As expected, I went a little extra and used self-stick laminating sheets and laminated the labels while they were on the toothpick. (Just used scissors to trim the plastic around the toothpick. It wasn't perfect, but the final project looked fantastic.
I also made a similar label with the student's name, date, and type of cell to fulfill the requirements for our particular assignment.
We decorated the cake on an 8-inch cake board and then put it into a pie carrier for transport. It fit perfectly in the pie carrier, but the labels got pressed down a tiny bit and the large label with the student's name and type had to be added once he got to school. (I put two toothpicks into the bottom of the large label to keep it steady.)